Formatting Your Files for Printing
DeFrance Printing, a longtime Paper Camp partner, is a favorite go-to printing resource for stationery, catalogs, and more. We asked Ronnie Williams to join us today to share the best ways to make sure your files are ready for printing. When you outsource your printing, it’s important to follow these guidelines to achieve the best results.
File Preparation Tips
Following these file preparation steps can improve the quality of your work, streamline the file submission process, and save you time and money on your print orders.
Recommended File Formats
-Flattened PDF: Profile PDF/X-1a
Properly prepared PDFs maintain your color profile, and are classified as “press-ready.” Most printers will also accept InDesign, Illustrator, Word, and even Publisher files, but additional costs and mistakes can occur whenever someone is preparing your files.
File Size
-Submit artwork to final trim
(See Bleed for specifications)
-Do not include crop marks
Sending your PDF in the actual file size ensures the final product is trimmed and finished correctly to your specifications. When printing with a bleed (see bleed specifications below), you should export your file utilizing the document set up bleed setting, rather than manually adding it to the final file size.
Bleed
-1/8″ (.125)
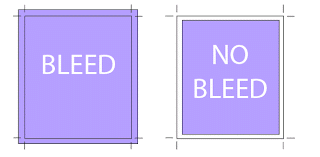
Whenever your artwork flows off the end of the page you need to add a 1/8” (.125”) bleed. This covers any natural paper movement on press or in the trimming process, and prevents cut-offs that can leave you with unintended white borders.
Resolution
-300 dpi or higher
Images lower than 300dpi can create a less than desired print quality, even if it looks good on your computer screen. Low resolution files will look pixilated or blurry in print. Image size is particularly important when printing large-format products such as banner, posters, or displays.
Fonts
-Outline all fonts
Outlining fonts is a step that is commonly overlooked. Make sure to outline your text to prevent any text re-flow or font substitution. Alternately, you can provide a “press-ready” PDF with embedded fonts (embedded automatically within the X-1a settings).
Color
-Always use either CMYK or Pantone “Spot” Colors
-Convert all RGB photos and imagery to CMYK
Color is a very important part of your project, and ensuring all of your artwork is converted correctly saves time, money, and mistakes.
Files that are prepared correctly will produce more accurate color, eliminate missing fonts or images, and improve decrease your production time. Over all, proper file preparation allows you to create quality and consistent product at a reasonable price.
You can find Ronnie and DeFrance Printing at these sites:
Connect with Katie Hunt
Katie Hunt is a business strategist, podcaster, mentor and mama to four. She helps product based businesses build profitable, sustainable companies through her conferences, courses and coaching programs.
Website: prooftoproduct.com | Instagram: @prooftoproduct


